Travelling Pokemon Trainer

normsmalltaxismall3googs


If you’ve walked outside in the past week and bumped into a person nose deep into their phone, they were probably playing pokemon go. As a child of the 90s I have fond memories of red and blue version and the endless hours spent playing them. Naturally, I picked up pokemon go immediately.


For those of you living under various rocks, pokemon go is a mobile game which makes you explore area around you to catch virtual pokemon. In order to catch pokemon you require a pokeball, These can either be bought with real money or you can receive them at various landmarks called “pokestops.” These “pokestops” are littered around cities and towns. The premise is simple, you walk around your town stopping at these landmarks and gain supplies.


This is ripe for optimization.


Luckily for us trainers this problem has already been explored, only in another form. The travelling salesman problem is a key problem in optimization. The travelling salesman classically had a person travel through a set amount of cities trying to minimize the distance she traveled while still visiting every city. This problem is computationally very tough to solve. Many algorithms have been written and tested to facilitate solving this problem.


The one i focused on is a genetic algorithm.  Genetic algorithms mimic natural selection in order to find an optimal route. In my search I found a great blog post on optimal waldo search methods that uses a genetic algorithm. Here you can see Randal S Olson using it to solve a version of the travelling salesman problem involving Where’s Waldo. Naturally I wanted to apply it to my pokestops.


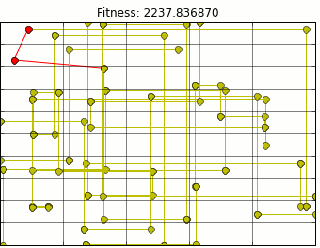
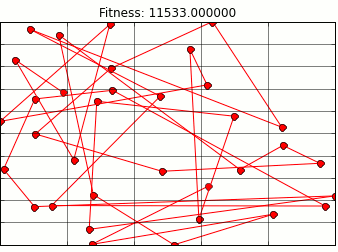
Using Mr. Olson’s Code and extracting all pokestop location data from Ingress (pokemon go precursor) provided me with the following path animation.


normsmall


Quick note here, this is not the most optimal path, but it is close. Due to the nature of genetic algorithms we will get a close estimate. There are a few problems with the above path. First most glaring problem is that It assumes we can walk through buildings. I am not a haunter, so this is outta the question.


Luckily, I live in a city which utilizes the grid system of road planning. Because of that I can use taxi cab distance  to approximate walking on a grid. However, in the upper left hand corner of the map above is a park with a good deal of pokestops. In the park area. In a park, I shouldn’t be constrained by buildings so I could walk on diagonals. I modified the code to calculate euclidean distance for park stops and taxi distance for everything else.


taxismall


There is still something wrong. As you can see above, we are still moving through buildings, but now at right angles. Figuring out when/how to route around corners and up and down streets is a little more of a project than I am ready to tackle. So lets let google do that for us. Tapping into the google maps api distances are calculated for us using the correct routing. Our final map looks like this (plotting shows route through buildings, however distance is correct).


googs


I guess I know which route I am going to be taking from now on.


Big shout out to Mr. Olson who wrote the underlying genetic algorithm code and part of the google maps api code I used. His write up on the waldo search is excellent and clear I highly suggest reading it.


As for next steps, there is something that is bothering me when I look at the above pathing, well a few things.


  1. It is not a closed loop:  I will have to walk allllllll the way back home from where ever this route lets me off. We need to add a constraint that the last stop has to be the same as the first.
  2. Will my bag be full at the end of this?: I dont wanna waste time walking to more pokestops if i can’t receive any more supplies.
  3. I don’t have to visit all the pokestops/ pokestops recharge: This is the most important one. Unlike the travelling salesman, i do not have to visit everyone. I can stay in a small subsection and just repeatedly go the the same 3 stops if i wanted to.


These are some important caveats to the map. We’ll see if we can solve them next time on pokemon.


-Marcello

Advanced Optimization Methods: Artificial Neural Networks Part 3

In our last part we went over the mathematical design of the neurons and the network itself. Now we are going to build our network in MatLab and test it out on a real world problem.

Let’s say that we work in a chemical plant. We are creating some compound and we want to anticipate and optimize our production. The compound is synthesized in a fluidized bed reactor. For those of you without a chemical engineering background, think of a tube that contains tons of pellets. Fluid then runs over these pellets and turns into a new compound. Your boss comes to you and tells you that there is too much impurity in our output stream. There are two things you can change to reduce the impurity, catalyst (the pellets in our tube) amount and stabilizer amount.

In the pilot scale facility, you run a few tests varying the amount of catalyst and stabilizer. You come up with the following table of your results.

Catalyst Stabilizer Impurities %
0.57 3.41 3.7
3.41 3.41 4.8
0 2 3.7
4 2 8.9
2 0 6.6
2 4 3.6
2 2 4.2


After looking at the results you decide to create a neural network to predict and optimize these values. As we know we have two inputs, catalyst and stabilizer, and one output, impurity percent. From our last part on structures of neural networks we decided that we need two neurons in our input layer (one for catalyst and one for stabilizer), and one neuron in our output layer (impurity percent). That only leaves our hidden layer, since we do not expect a complex difficult problem that requires deep learning we only choose one layer. As for neurons we will choose 3 neurons to make the problem a little more interesting. The structure is shown below.

Screen Shot 2015-07-28 at 9.26.26 PM

Now that we have the structure let us build our network in MatLab. The code is actually quite simple for this part. First we input our two variables in a x by 2 matrix. We then multiply these by our first weights from our hidden layer and pass them through our sigmoid function. These values are then multiplied by the weights from the output layer then passed through the sigmoid function again. After they pass through they become our output, impurity %.  So lets see how our network performs the vector on the left is our actual values (scaled to the max) and on the right is what our network determined.

Screen Shot 2015-07-28 at 10.31.56 PMScreen Shot 2015-07-28 at 10.31.21 PM

As you can see, the network did not guess even remotely correctly. Well we are missing the most important part of the neural network, the training. We must train our network to get the right predictions. In order to do this we need to do our favorite thing, optimize.

-Marcello

Heres the code:


% ANN code
% structure:
% 2 input
% 3 hidden nodes
% 1 output

%initial input data [ catalyst, stabilizer]
input_t0 = [0.57	3.41; 3.41	3.41;0	2;4	2;2	0;2	4;2	2];
%normalize input data
input_t0(:,1) = input_t0/max(input_t0);
input_t0(:,2) = input_t0/max(input_t0);

%normalize output data
output_t0 = [3.7 4.8 3.7 8.9 6.6 3.6 4.2];
output_t0 = output_t0/max(output_t0);

%randomly assigned weights
weight_in = [.3 .6 .7;.2 .8 .5];
weight_out = [ .4 .6 .7]';

%initialize matrices
actHidSig = zeros(7,3);
actOutSig=zeros(7,1);

%find activation for hidden layer
act_hid = input_t0*weight_in ;

%apply sigmoid to hidden activation
for i = 1:7
    for j = 1:3
        actHidSig(i,j) = 1/(1+exp(-act_hid(i,j)));
    end
end

%find activation for output layer
act_out = actHidSig*weight_out;

%apply sigmid to output activation
for i = 1:7
    
        actOutSig(i) = 1/(1+exp(-act_out(i)));
    
end

%show results
output_t0'
actOutSig

Advanced Optimization Methods: Artificial Neural Network Part 2

The previous was a brief overview of how to construct a neural network. This part we will go in depth and actually do a little math to create these networks. Just a quick reminder from part 1, our general network contains three layers, one input layer, one hidden layer, and one output layer. For this example I will try to maintain generality. We start with an input layer neuron.

Input layer neurons are the most simple (and the most boring ) neurons of the system. ILN do not accept any inputs, as they are the inputs. Their job is to simply pass the inputs to the hidden layer. There is exactly one input layer for any given NN (as far as I know). Each variable we are looking at gets its own input layer neuron. If we are looking at 3 variables, we would have 3 ILN, if we had 5 variables we would have 5 ILN, 100 variables,100 ILN and so on. They do not modify or weigh the inputs, nor do they apply the activation function before passing on the inputs.  The next layer is the hidden layer, which is much more interesting.

600px-ArtificialNeuronModel_english

Above is a schematic of our hidden layer neuron (HLN). The x values here are from our input layer (or previous hidden layer). These values are then weighed and summed. Giving us a new value. The summation is listed below.Screen Shot 2015-07-19 at 12.26.24 PM   This new z value is passed to our activation function. Last post we skipped over our activation function, however it deserves some attention now. The point of our activation function is to introduce non-linearity to our method. For this neural network I have chosen the sigmoid function. Why did I choose this  function? For one it is real-valued and differentiable.  Second it has an interesting property of its derivative. The derivative of the sigmoid function is equal to the sigmoid function times one mine the sigmoid function. This makes the derivative computationally easy. However, the sigmoid function is used most often for the non-linearity I mentioned before. Below is the function (from wikipedia) as well as the equation and derivative property.

Logistic-curve.svgScreen Shot 2015-07-19 at 1.06.26 PM

Using this activation function we then take our z value, which is the summation of our newly weighed inputs, and put it through our simplified sigmoid function. The result of the activation function becomes the input for the next layer, which is our output layer. However, before we move on to an output neuron we have to go over how to determine how many hidden layers we need and how many neurons are in each of those layers. For most applications one layer would be appropriate. One thing to know is that increasing the number of layers give marginally better results.  There are a good amount of differing opinions on the amount of hidden layers needed, however there is even more confusion about the amount of hidden neurons needed in those layers. A quick heuristic is that the number of hidden neurons should be somewhere between the amount of input neurons and output neurons. However, this is just a rule of thumb and should not be taken as a hard and fast rule. Really the best way is to test our your network and “prune” out those neurons that aren’t contributing. Before we get to that we have to look at our last layer, the output layer.

An output layer neuron is just like a hidden layer neuron, however the output of the OLN is the answer or prediction we have been looking for. The output layer takes all the results of the activation functions from the previous layer and weighs them. It then sums all the weighted values and puts them through our sigmoid function again. After it passes through our function our method is complete.  Like the input layer, there is only one output layer. The number of neurons in this layer depends on the problem. If we are trying to predict a value only one neuron is needed, however, if you are trying to classify a data point you may need more than one neuron.

One big thing we over looked so far was why and how ANN work. Well we have to fine tune the weighs for each neuron (wij). By changing and optimizing these values we can make the network give us the information we want and need. This is called training our network, we will go over this in our next part.

-Marcello

Advanced Optimization Methods: Artificial Neural Networks Part 1

If you’ve been following along we’ve finally got to the fun stuff. The first “advanced” topic we will explore is Artificial Neural Networks (ANN). ANN is a simplified model of a network of “neurons” like the ones that make up our brains. Each neuron takes in information and transmits to another neuron, which in turns analyzes(weighs) and modifies the input and sends it to the next. Well how does this help us optimize? Neural Networks let us predict and optimize problems  at a greater speed and with greater accuracy than other methods. That is after they are trained, but more on that later. First lets look at an individual neuron then see how it interacts in a network.

Blausen_0657_MultipolarNeuron

Above is a diagram of a neuron (from wikipedia), the ones actually in your brain. Our artificial neurons look a very similar to the one above. Now not all the structures labeled on the above picture are important. The two we are concerned with are the dendrites and the Axon, take a quick note that both of these structures have branches.  Just a brief tangent from when I use to work as a neuroscientist at the Motor Neuron Center, neurons work by transmitting signals through their axons and receiving signals from their dendrites.  Neurons can receive tons of connections from other neurons through their dendrites. However, they can only have one outgoing connection through their axon. This is a very simplified explanation, but nevertheless important.  Our artificial Neurons will work in pretty much the same way.

600px-ArtificialNeuronModel_english

Above is a diagram of an artificial neuron (from wikipedia), the ones we will use in our method. Unlike our real neuron diagram, all the labels are important here. We will start with the axons from other neurons (inputs) to the dendrites (weights) and into the cell body (transfer function/activation function) and then leave the neuron to the next neuron through the axon (activation). So we have an idea of how the data moves through a neuron, but what does any of this exactly mean.

So imagine we have the neuron listed above. It has n axons attached to it. Each axon will transmit a number (xn)to this neuron. The neuron then weighs each of these numbers by multiplying it by its respective weight (wnj). These newly weighted numbers are then summed at our transfer function step. This new number is then passed to our activation function. This is where the power of neural networks is derived. Different activation functions can be used to achieve more accurate methods than their linearly bound counterparts. After the weighted average is passed through our chosen activation function we pass that newly created matrix of values to the next neuron and the method repeats. This leads us to the network part of neural networks.

300px-Colored_neural_network.svg

Above is an example of a very simple neural network. The network consists of three parts or layers, input layer, hidden layer, and output layer. Each layer can be made up of as few or as many neurons as the user designs. Also it must be noted that the hidden layer is not restricted to single column of neurons. There can be 3,4 or 100 layers in the hidden layer depending on the design and the neurons required, these however, must be designed initially before any optimization takes place. Another thing to note is that all neurons point forward. This is called a feed-forward design. Having this limitation becomes important when we look at the optimization portion but that comes later. Each neuron outputs to every neuron in the next layer and receives inputs from every neuron in the layer previous.

That’s a general overview of how feed-forward artificial neural networks work. Next part we will derive some equations and make a general outline of how to create an ANN.

-Marcello

GRADIENT SEARCH METHODS: NEWTON-RAPHSON METHOD PART 3

Most of the limitations of NRM in multiple dimensions are the same as those for NM in one dimension. The main issues stem from three major areas (per usual), initial point, derivatives, and function evaluations.

Our initial value for Newton’s method greatly determines the effectiveness.The closer our initial guess is to our minima the better the method will work. However, this requires some intuition of the function which can get quite complex. Lets take a look at two different initial points (20,20) and (2,2). The graph of (20,20) method is below.

Screen Shot 2015-07-18 at 11.16.51 AM

As you can see the method is flying back and forth past our minima. However, the method eventually converges at (0.9987, 0.4987), our target minima. Below I have included a matrix containing our initial step and all of the following steps (taken from matlab output).

Screen Shot 2015-07-18 at 11.26.46 AM

Now lets try it again with our other initial point (2,2). This is already close to our minimum so it shouldn’t take too many iterations.

Screen Shot 2015-07-18 at 11.29.31 AMScreen Shot 2015-07-18 at 11.30.56 AM

The closer initial staring point converged in a fifth of the iterations which means a less function evaluations. This brings us to our next two issues, derivatives and function evaluations. We need to be able to find the Hessian of our function as well as the gradient. If we cannot take these two we will need to pick a different method or modify our existing. Most problems stem from the Hessian. Sometime the Hessian cannot be found, other times it can be found but not inverted, but most of the time it is just too expensive to evaluate or invert. Mathematicians have come up with alternative methods called quasi-newton methods (these actually stem from the secant methods I mentioned before) which seek to remedy this issue. Like the one dimensional version, there are a lot of function evaluations.  Each derivative of the gradient must be evaluated as well as all of the second derivatives that make up the hessians. The hessian then needs to be inverted which is expensive at higher dimensions.

Now you have two tools to deal with finding minima at higher dimensions. Up next we will explore new more advanced methods for optimization.

-Marcello

Gradient Search Methods: Newton-Raphson Method Part 2

Last post we got an idea of how Newton-Raphson works (and how similar it is to the one dimensional version). Here we will explore step by step how the algorithm works and how quickly it arrives to our minimum.  We will be using the same function as before so we can compare how quickly the method descends. Here is our function in both a surface plot and a contour plot as a reminder. (f(x,y) =  x^2 -x+cos(y+x)+y^2

Screen Shot 2015-06-30 at 9.39.18 PMScreen Shot 2015-06-30 at 9.47.29 PM

As you can see it is a relatively simple surface and convex. In order to use Newton Raphson, we need to take both the gradient and the hessian of our function. A quick mathematics reminder, The gradient is the vector which contains first derivatives of the function with respect to each of its variables. Below you can see a general case for the gradient as well our specific gradient for this function.

Screen Shot 2015-07-18 at 8.15.45 AM

As I mentioned last post we also need the equivalent of the second derivative for newton-raphson. This takes the form of the hessian. Another quick mathematics reminder, the Hessian is the square matrix consisting of all the second derivatives of our function. The Hessian exhaustively takes the derivatives of the function with respect to one variable an d the second derivative with respect to every variable again. To clarify this i have left the general case below along with our specific case.

Screen Shot 2015-07-18 at 8.14.09 AM

Note that the Hessian above is a square matrix (it always should be). The second check that has to be made is to ensure that the Hessian is invertible. Since we are dealing with matrix we cannot “divide” matrices, we must use the inverse of the Hessian instead. This comes into play with our iterative step. Now to start our method we need an initial point, we are going to use the same one as we did with Steepest Descent (8,8).  With these values we calculate our Hessian and Gradient which gives us the following. Screen Shot 2015-07-18 at 8.58.19 AMWe now take the inverse of the Hessian and then find our next point. The iterative equation is listed below as well as the output.

Screen Shot 2015-07-18 at 9.10.17 AM

Our new point was a considerable decrease from our starting point. We repeat the above steps until we reach our stopping conditions which I set as our normal tolerance limits. I allowed the method to iterate until these conditions were met. The steps are outlined in the plot below.

Screen Shot 2015-07-18 at 9.43.38 AM

The graph above looks similar to our dynamic steepest descent. As you can see the method was very direct. Taking only 5 iterations our method produces a minimum of (0.9987,0.4987). This is pretty much dead on to the actual minimum of our function. Newton Raphson makes quick work of the minimization. Next post we will look at the limitations of this method. Code below.

-Marcello


%newton raphson in  dimensions
%f(x,y) =  x^2 -x+cos(y+x)+y^2

x=zeros(2,7);
z=zeros(1,7);

x(1,1)=8; %initial guess
x(2,1)=8;


tol(1)=1;
tol(2)=2;

i=2;


while tol(1) >0.0001 && tol(2) > 0.0001 %stop conditions

    %gradients
    dx1 = -1+2*x(1,i-1)-sin(x(1,i-1)+x(2,i-1)); %gradient dx
    dx2 = 2*x(2,i-1) - sin(x(1,i-1)+x(2,i-1)); %gradient dy

    g=[dx1,dx2]';%gradient matrix
    
    %hessian
    ddx1= 2 - cos(x(1,i-1)+x(2,i-1)); % sames as ddx2
    dx1dx2= -cos(x(1,i-1)+x(2,i-1)); % same as dx2dx1

    h =[ddx1 dx1dx2;dx1dx2,ddx1]; %hessian matrix
    
    x(:,i) = x(:,i-1)-hg;
    
    
    tol(1) = abs(x(1,i)-x(1,i-1)); %tolerance calc
    tol(2) = abs(x(2,i)-x(2,i-1));

    z(i) =x(1,i)^2 -x(1,i)+cos(x(2,i)+x(1,i))+x(2,i)^2; % function eval

    i=i+1;
end


Gradient Search Methods: Newton-Raphson Method Part 1

This method is gonna feel more than a little familiar. But before we get to the nitty gritty I have to give a disclaimer. This method is not purely a gradient method, as it does not solely rely on the gradient as a method of optimization. The method uses the gradient along with other properties of the function to arrive at our minimum. Now that that has been cleared up let move onto the method.

We are going to take a similar approach as we did with our one dimensional search methods. Steepest Descent reminds us of the golden section search and the fibonacci search. While they are used differently there are prominent similarities. When we looked at Steepest descent we had two cases, one with a constant step size and another with a variable step size. Eventually we reached an optimal case for these methods and we needed a new method. At this point we moved on to Newton’s method. Well, we are going to do that again, only in higher dimensions.

The next part is gonna be verrrrry familiar.

As you know the first and most important thing when thinking about using Newton-Raphson method is to ensure that the function is twice differentiable.  Like in one dimension, Newton-Raphson method uses a truncated taylor series to estimate where the minimum lies.

Newton-Raphson method uses a single point to begin. This point is used as a basis for our Taylor expansion. We need to take a brief detour to go over why we want to construct a Taylor Expansion. By doing this we create a quadratic approximation of our function locally, which we can in turn minimize. We repeat this until we hit a stationary point or our minimum.  So lets start with the Taylor series in N-dimensions, however we are only going to focus on the first three terms (this gives us up to the quadratic approximation).

Screen Shot 2015-07-16 at 9.19.58 PM

The above equation looks a little different than our previous Taylor expansion. As you can see there are no squares and no derivatives or  second derivatives (well not completely true).The first derivative is here is none other than our Gradient which is denoted by g. However, if you remember from the last time we dealt with the taylor series the third term deals with the second derivative. In n dimensions we need  an equivalent to the second derivative, for this we use the Hessian Matrix, which I have denoted as F. Now we use our first order necessary condition for optimality, this sets the gradient of our function equal to zero. From this we can determine our iterative step.

Screen Shot 2015-07-16 at 9.56.46 PM

This looks awfully like our iterative steps from our one dimensional Newton’s method. .  As we get closer to our minimum the gradient, g, of our function moves toward 0 which makes xk≈ xk+1. This is when we know our method has found a minimum (hopefully). Hopefully this all feels familiar. Next post we will see how Newton Raphson works.

-Marcello

Gradient Search Methods: Steepest descent Part 3

We have looked at the method behind steepest descent and explored two ways of calculating our step size. In this post we will look at the limitations and the best use practices for the method of steepest descent. 

Overall the method of steepest descent is a reliable and standard test method. However, the sacrifice is speed. When the functions get more complicated and the evaluations more expensive the method of steepest descent begins to lag behind other methods.  This tradeoff is an important one, as the desire to reach a minimum is counteracted by the waiting time.

The method is steepest descent is generally used when a minimum must be found. This search method would not be appropriate for functions which need to be optimized quickly and roughly. This also brings us to our step finding method. 

Between the step finding methods we can drastically change the behavior of our search method. It also may require us to take derivatives of our function (which may or may not be applicable at our test points). A standard step size might be useful to minimize derivative evaluations, but at the cost of time. Nevertheless, the method of steepest is a reliable and consistent method. 

It is necessary to note that for any applicable function, the method of steepest descent will find a minimum. This guarentee must be noted when evaluating proper search methods, and makes steepest descent necessary for anyone’s optimization quiver. 
-Marcello

Gradient Search Methods: Steepest Descent Part 2

If you followed from last post we derived (loosely) our iterative step. With that we can go about with out steepest descent method. We start by choosing an initial guess for our function, for this function i have chosen (8,8). This is plotted below on the level curve.

Screen Shot 2015-07-07 at 9.16.48 PM

From this point we must calculate the gradient. I have taken the gradient of our function (f(x,y) =  x^2 -x+cos(y+x)+y^2). This gradient must now be evaluated at our point (8,8)

Screen Shot 2015-07-07 at 9.21.46 PM

As I mentioned earlier we really need two things for our method, a direction and a step size. With the gradient evaluated we have our direction, now we need our step size. This is where we have options. For the step size we have 2 general options. We can choose a constant step size (think GSS) or we can have a dynamic step size (think FS and NM). In this post I will show both.

For constant step size we have a few issues. As you can see in our level plots we are not exactly close to our minimum. so we can choose a large step size to get close fast. However, once we get close to our minimum the large step size will cause us to over shoot. Trying to correct the over shoot the method will then over shoot in the opposite direction. So that leaves us with choosing a smaller step size. Well this brings its own problems. The small step size takes a much longer time to reach our minimum when our initial guess is far. I went with the smaller step size for the constant step size version.

What about the dynamic step size? What we are actually doing with the dynamic step size is solving an optimization problem. We are finding the step size that minimizes our function the most. We want to minimize the the following f(x-alpha*d) where d is the gradient evaluated at x. Here are a few options to minimize this. We can use an ODSM from before to calculate a estimate of the best step size or we can use them to find the exact best step size. Both of these become very expensive with little benefit. Instead we use a method called backtracking line search. This method gives us an acceptable step size while not being to computationally heavy. With backtracking line search, we start with an initial step size,alpha, and we check if x+alpha*d is an acceptable point. WE do this by using the Armijo-Goldstein Condition. This condition ensures that the step size we take makes our function decrease. If it does not satisfy this condition we half our alpha and try again. We try until the condition is satisfied. When it is satisfied we continue with out descent method.

Now that we have our two methods, lets check how they compare. Here are the first three steps. On the left is our constant step size, on the right is backtracking line search step.

Screen Shot 2015-07-07 at 10.09.11 PMScreen Shot 2015-07-07 at 10.12.09 PM

As you can see the constant step size is slowly making its way there, however, the dynamic step size has already over shot the minimum and is backtracking. Lets try another three steps.

Screen Shot 2015-07-07 at 10.19.43 PMScreen Shot 2015-07-07 at 10.19.19 PM

More of the same in these graphs. The constant step size is slowly chugging along, while the dynamic step size has arrived at the minimum and waiting for the other method to catch up. The dynamic step size plot looks almost identical to the one before. This is because the method is overshooting and backtracking over the minimum until the steps get smaller than our tolerance. After that point our method stops and gives us our minimum. If we let both methods terminate we find that the constant step size takes over 40 iterations while the dynamic only takes 6. Now what about accuracy. Our minimum for our function is around (0.99865, 0.49865). Our constant step size gives us a minimum of (0.9990,0.4991), dynamic gives us (0.9986,0.4986). It looks like we have a clear winner. In this case, the dynamically changing step size not only beats the constant in number of iterations, but in accuracy as well.

I hope this clarified steepest descent. Next post we go over the limitations to this method (it will be brief there aren’t a ton). I have added my code below which is separated into constant and dynamic. Enjoy

% steepest decent 
%f(x,y) =  x^2 -x+cos(y+x)+y^2.

%% constant step size
x = zeros(1,10);% initialize arrays
y = zeros(1,10);

x(1)=8; %initial guess
y(1)=8;

%dx = -1+2*x-sin(x+y)
%dy = 2*y-sin(x+y)

a0=0.1; %initial step size

tol(1)=1;
tol(2)=2;

i=1;

while tol(1) >0.0001 && tol(2) > 0.0001 %stop conditions

    dx = -1+2*x(i)-sin(x(i)+y(i)); %gradient dx
    dy = 2*y(i) - sin(x(i)+y(i)); %gradient dy
 
    i=i+1;
    
    x(i) = x(i-1)-dx*a0; %iterative steps
    y(i) = y(i-1)-dy*a0;
    
    tol(1) = abs(x(i)-x(i-1)); %tolerance calc
    tol(2) = abs(y(i)-y(i-1));
    
    
end

%% Backtracking line search

x = zeros(1,10);
y = zeros(1,10);

x(1)=3;
y(1)=3;

%dx = -1+2*x-sin(x+y)
%dy = 2*y-sin(x+y)

ay=1;
ax=1;

tol(1)=1;
tol(2)=1;

i=1;

while tol(1) >0.0001 | tol(2) > 0.0001

    dx = -1+2*x(i)-sin(x(i)+y(i));
    dy = 2*y(i) - sin(x(i)+y(i));
 

    %evaluate function at different points
    fc =  x(i)^2 -x(i)+cos(y(i)+x(i))+y(i)^2;
    newfx =(x(i)-dx*ax)^2 -(x(i)-dx*ax)+cos(y(i)+(x(i)-dx*ax))+y(i)^2;
    newfy =x(i)^2 -x(i)+cos((y(i)-dy*ay)+x(i))+(y(i)-dy*ay)^2;
    
  
    while newfx> fc -ax*dx %Armijo-Goldstein Condition check
        ax=.5*ax; %shrink step size
        % function eval at new step
        newfx =(x(i)-dx*ax)^2 -(x(i)-dx*ax)+cos(y(i)+(x(i)-dx*ax))+y(i)^2;
    end
    while newfy > fc -ay*dy
        ay=.5*ay;
        newfy =x(i)^2 -x(i)+cos((y(i)-dy*ay)+x(i))+(y(i)-dy*ay)^2;
    end
    
    i=i+1;
    x(i) = x(i-1)-dx*ax;
    y(i) = y(i-1)-dy*ay;
    
    tol(1) = abs(x(i)-x(i-1));
    tol(2) = abs(y(i)-y(i-1));
    
    
end

Gradient Search Methods: Steepest Descent Part 1

If you have been following along we have worked through a bunch of one dimensional search methods. However, what happens when we need to perform a search on multiple dinensions?  Well we need a new search method that can be expanded to multiple variables while still finding a minimum (or maximum).

The method should work similar to our previous methods. However, it should be applicable up to n variable. With this in mind we set out to design a search method. As we have seen before, we need two things for a successful search method. First we need to know where we are going (direction) and second we need to know how far to go in that direction (step size). With these two pieces of information we can go about finding our minimum (or maximum).

Let’s focus on the direction first. We want our function to decrease fastest on our chosen direction. If we look at a multi variable function which is both defined an differentiable in a small area around a point (otherwise known as a neighborhood), we find that the function decreases fastest along the negative gradient of the function. Let’s test this out.

Let’s take a simple multivariable function f(x,y) =  x^2 -x+cos(y+x)+y^2.  Plotting this produces the following 3D graph and contour plot. Take notice of the Contour plot it will help us to determine our direction.

Screen Shot 2015-06-30 at 9.39.18 PMScreen Shot 2015-06-30 at 9.47.29 PM

We have an infinite number of directions to move In but let’s choose four test cases. We will choose the gradient, the negative gradient, and two other directions. For our initial point lets choose (-6,8). This point lets use evaluate our gradient Mapping these directions (all with a step of 0.1 ) produces the following graph.

Screen Shot 2015-06-30 at 10.26.20 PM

Now this isn’t a rigorous proof (or a particularly fantastic one) but as you can see our function is lowest in the direction of the negative gradient. As you can see the negative gradient line (magenta) points toward the center of the contour plot and to the lowest function evaluation. All other points are off center or in completely wrong directions. However, this only holds for a small neighborhood around our point. If we take too big a step then we might end up a wrong point or higher function evaluation. This brings us to our next requirement a step size.  There are a few ways to determine a step size. The two major ways are a static step size (kinda like how we reduced our interval in GSS), and a dynamically changing step size. Regardless of which we end up choosing lets represent the step size by rho, ρ.

We now have our step size (ρ) and our direction (negative gradient). With this we can begin our search. With initial point “a” we evaluate the gradient. The gradient is then scaled by our step size and subtracted to from our initial point. This gives us our second point “b.” We then repeat this with point “b.” Evaluate the gradient, scale by the step size, subtract from point “b” to give us point “c”. This is outlined below.

Screen Shot 2015-06-30 at 7.22.50 PM

So you probably realized where we were headed. Following the steps above we have determined our iterative step. Like our previous one-dimensional search methods, our gradient search method iterates the above equation until a tolerance condition is met. The method described above is called the Method of Steepest Descent or Gradient Descent. Next Post we will go over the method with a real example.

-Marcello